Sunlu is on a roll – after having released its S9 plus printer earlier this year, we can now welcome the Sunlu Terminator 3, or Sunlu T3, to its FDM 3D printer line-up.
The new Sunlu Terminator 3 has everything you need to get started printing right away, including filament runout detection, clog detection, and power loss recovery. This one is designed to print at speeds of up to 250 mm/s, which is quite impressive, but will the quality be up to par?
With its impressive features right out of the box, and it’s competitive price, the Sunlu Terminator 3 looks to gain a strong foothold in the current mid-range 3D printing market. This also makes the new T3 is a worthy competitor against Anycubic’s latest superb effort, the Anycubic Kobra Neo.
Let’s take a look at the Sunlu Terminator 3 to see what it can do and how its print quality compares to the rest of our best 3D printers.
Sunlu Terminator 3: Design and setup
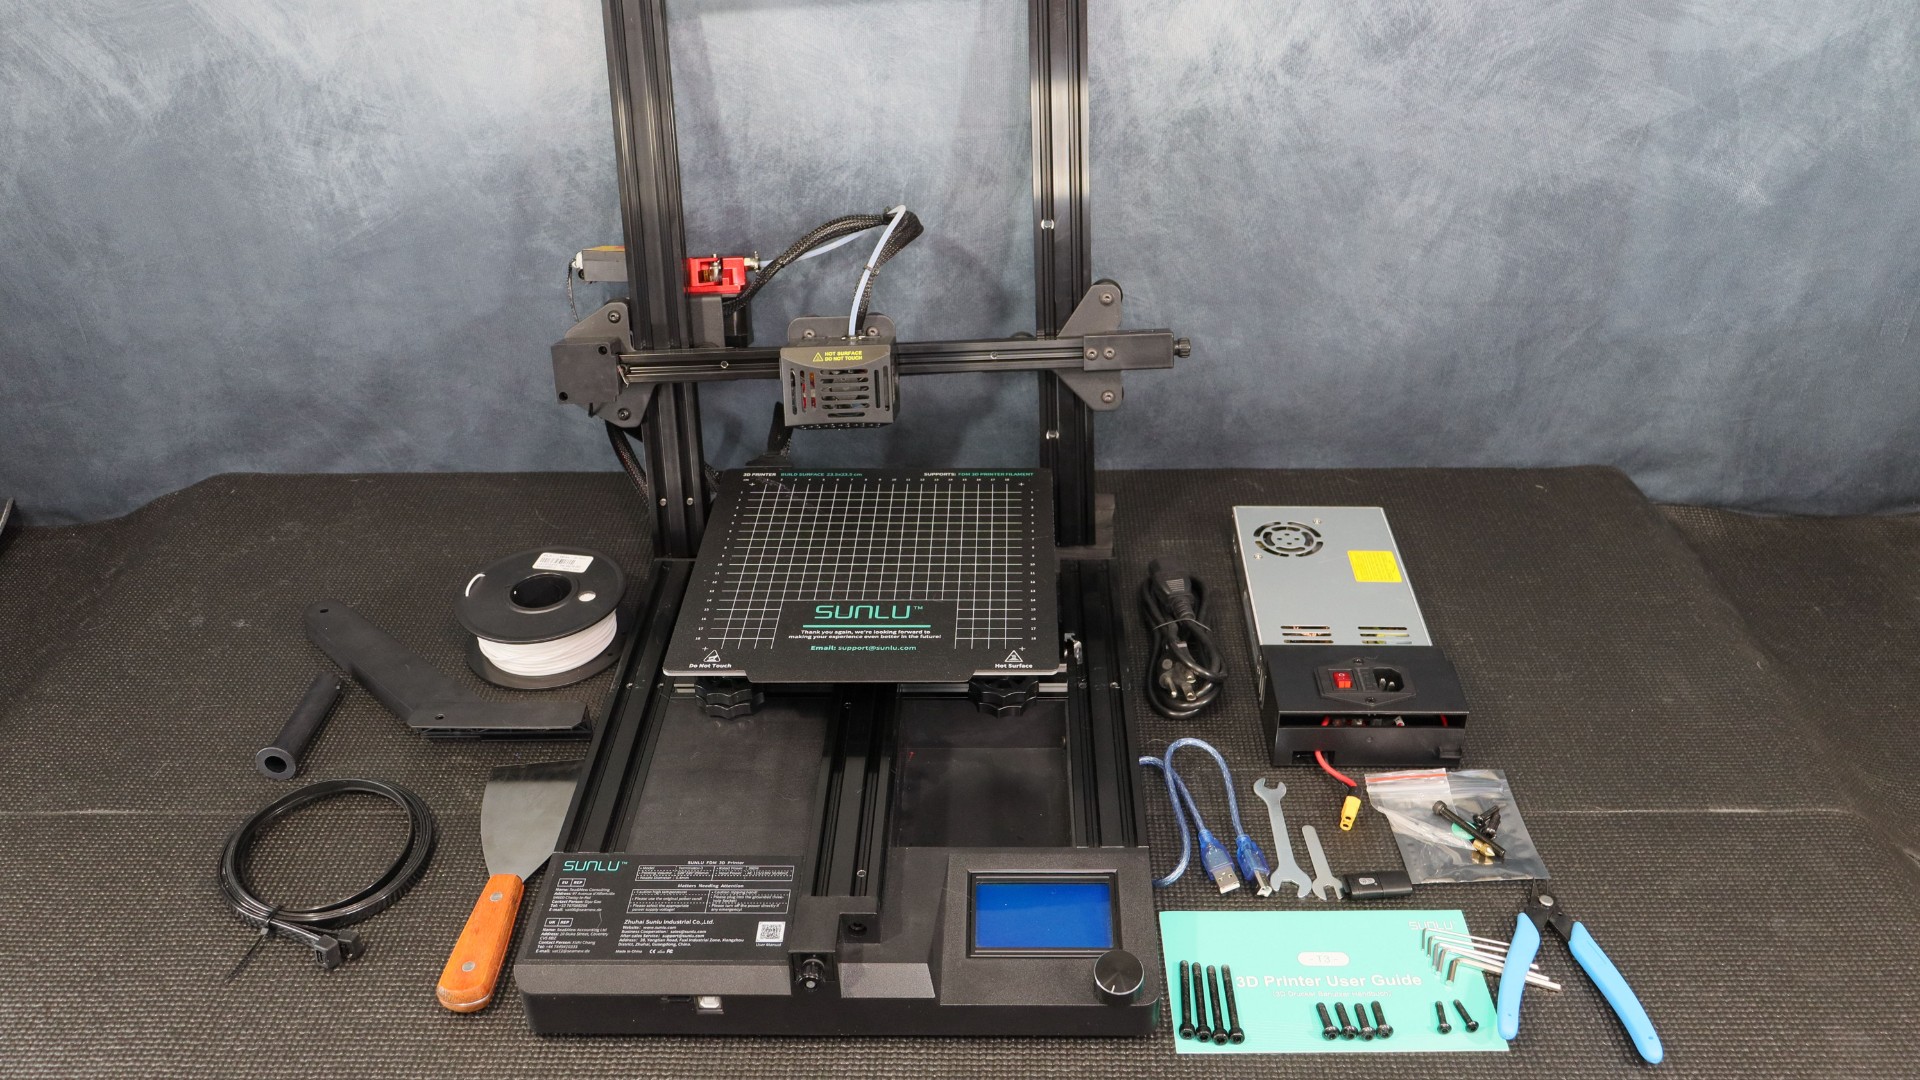
What’s in the box
Assembly screws
Allen key wrench set
Spare parts
Micro SD card
USB Card reader
Power cable
Metal spatula
Side cutters
Wrenches
USB Cable
Spool holder
Zip-ties
Sample Filament spool
Manual
Printer frame and base
The Sunlu Terminator 3 set-up is one of the most straightforward printers we’ve ever tried. Thanks to the detailed assembly instructions and numbered bags we managed to put everything together in about 10 minutes. The assembly process starts with mounting the upright assembly to the printer base, then you attach the filament spool holder, and finally you mount the power supply vertically on the back of the right side of the Z upright profile. When finished, ensure that the power supply voltage is set to the voltage used in your country.
Once the printer has been assembled, the next important step is to go through the levelling routine. You can do this by going into the motion menu and then levelling from the main menu.
The first step is to set the Z-offset. By selecting Z-offset, you can direct the printer to the center of the bed. We set the offset on a piece of regular copy paper so that the nozzle just begins to grab the paper. When you’re finished, make sure Auxiliary leveling is enabled.
You can start your first print now, but there is also a manual levelling option to help make the leveling process more accurate. You will need to adjust the dials on each corner using the paper, just as you did with the Z-offset. The second dial helps to lock each corner into place once you’ve set each corner. Now you’re ready to load your spool and print whatever your heart desires.
Sunlu Terminator 3: Specs and features

KEY SPECIFICATIONS
Leveling: 16-point automatic leveling
Printing platform: 220 mm x 220 mm x 250 mm
Printing material: 1.75mm PLA, PLA+, carbon fiber, ABS, (low temp), PETG, HIPS, WOOD, PCL, TPU
Nozzle size: ø 0.4 mm (replaceable)
Nozzle temperature: ≤ 500°F / 260°C
Hot bed temperature: ≤ 230°F / 100°C
Printing speed: 20-250 mm/s
Recommended Printing speed: 40-60 mm/s
Control panel: LCD screen with control knob
Z-axis: Single threaded rod
Printer dimensions: 440 mm x 400 mm x 470 mm
Built in the traditional FDM style, the Sunlu Terminator 3 is , with a sleek base housing all of the electronics, a flexible magnetic build surface, and a power supply mounted vertically. The Sunlu T3 has a 1:1 extruder with an all-metal dual gear extruder. Just before the extruder is a filament run-out/clog detection module which is a very handy feature.
Sunlu uses dial controls on an older-style text screen. So, while it does not have a fancy touch screen, it does have all of the options for adjusting every setting on the printer, which we believe outweighs the lack of a fancy touch screen. From acceleration to jerk control and axis steps per mm, the configuration menu allows you to fine-tune all aspects of the printer.
The Terminator 3 is outfitted with a fast 32-bit mainboard and silent stepper drivers on all axes. The 32-bit board performs admirably during regular printing and has the necessary speed when switching to the 250 mm/s fast print mode. The Terminator 3 noise levels averaged 43 to 48 Db during regular printing, but, as expected, were significantly higher during fast printing.
Sunlu Terminator 3: Print quality and speed
To really put the Sunlu Terminator 3 through its paces we decided to print a variety of different kind of models using various filament types.
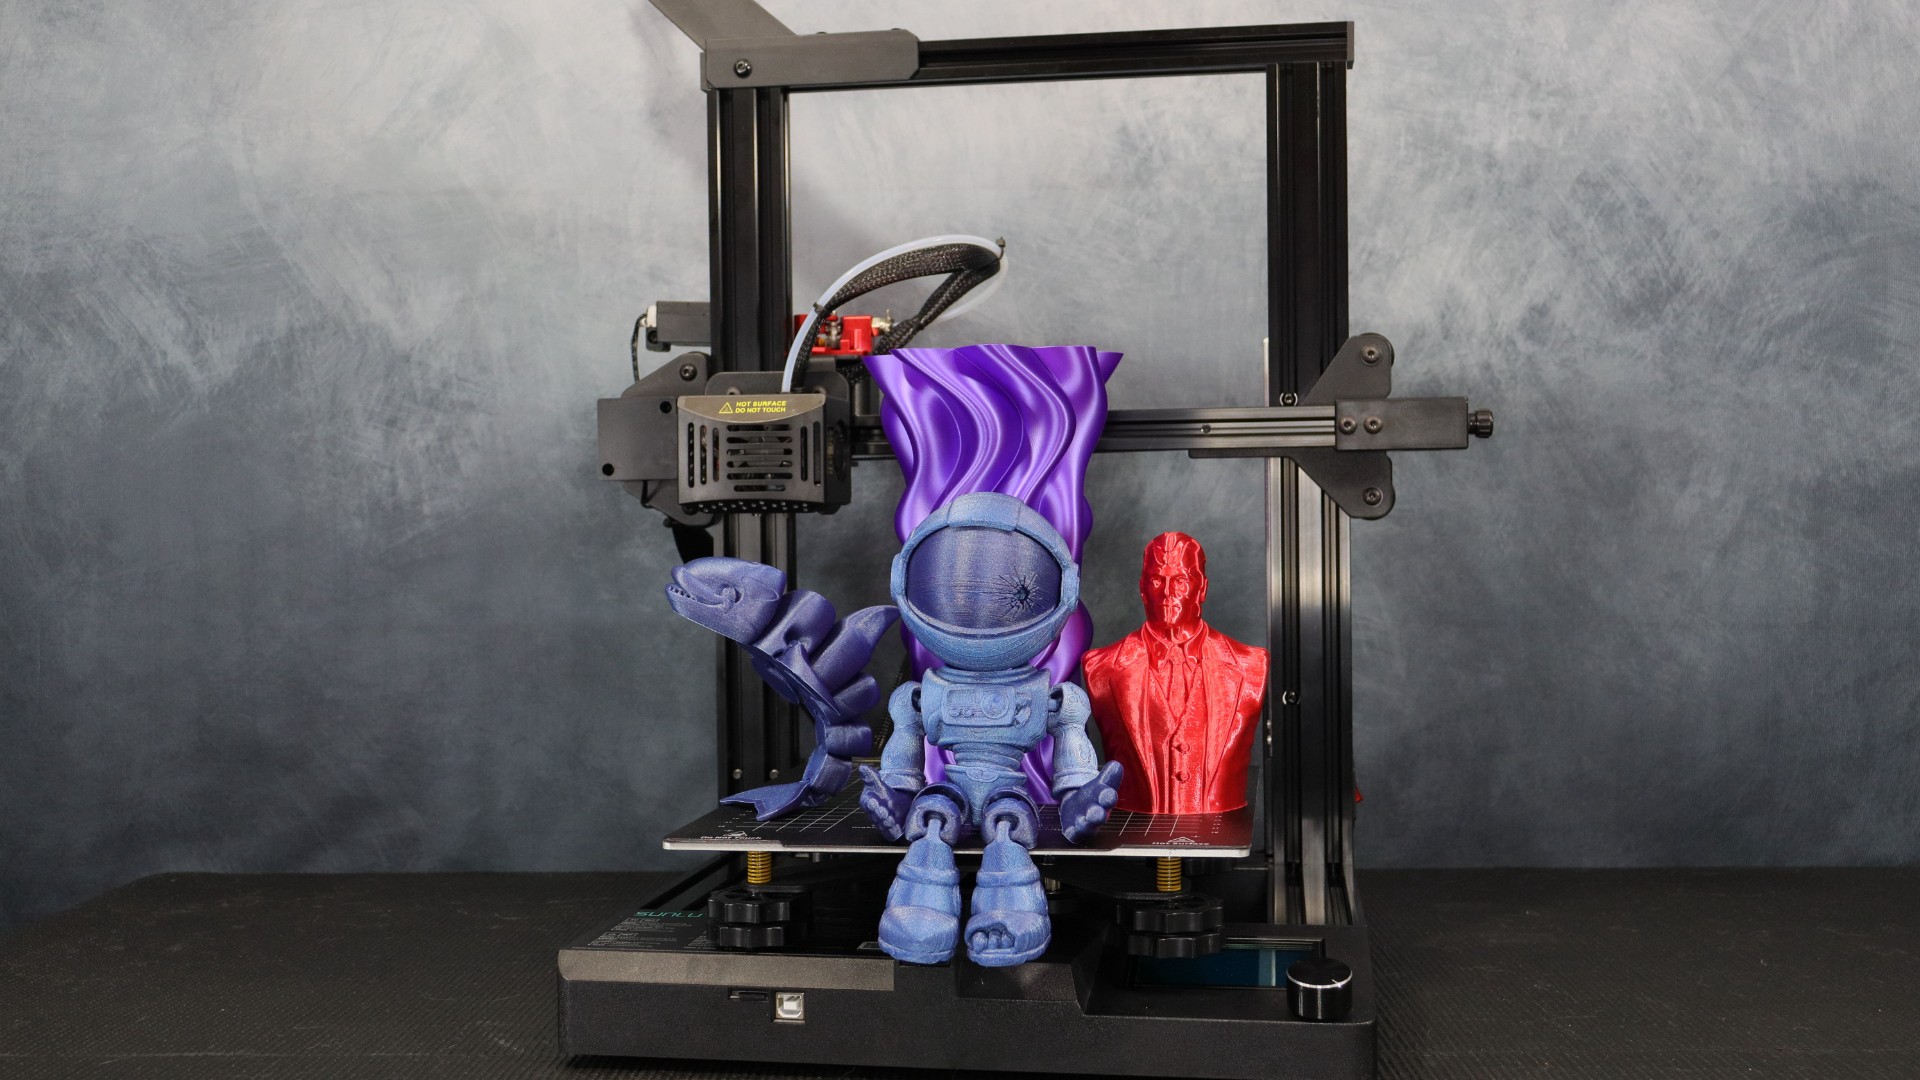
When testing out the T3, a simple vase was the first print we decided to try. Cura (opens in new tab)‘s Spiralize Outer Contour mode was used with a layer height of 0.2 mm Polymaker silk purple PLA (vase mode). This is one of the nicest vase prints I’ve seen right out of the box. The purple silk catches the light and creates a stunning print, despite the fact that the vase is a simple print. Every layer is clean and even, with no visible over or under extrusion throughout the print.
For our second test, we decided to use a Hex3D (opens in new tab) bust. The Vision bust was printed with Eryone ultra silk red PLA and a layer height of 0.16 mm with 15% cubic infill at 70 mm/s. This print turned out beautifully. All of Vision’s details were visible in the print, and there was no over or under extrusion.
We then decided to try a more complex Flexi print, and we found the perfect model in Flexi Factory (opens in new tab)‘s Skeleton Astronaut. This print has movable joints as well as a visor that drops down and retracts into the helmet. We printed this with Eryone Galaxy blue glitter filament, although fair warning, it can be difficult to tune in to this specialized material. This is due to the aluminum powder in the PLA, so we had to change the 0.4 mm nozzle that came with the Terminator to a 0.6 mm nozzle to print with this material. At 0.16 mm layer height and 15% cubic infill, the model printed beautifully. We printed this model at a speed of 70 mm/s and are very happy with the results.
To round off our testing we tried out another Flexi Factory flexi model because they’re always a fun 3D print with their movable parts. The Flexi Orca turned out wonderfully using the same Eryone Galaxy glitter blue PLA and 0.16 mm layer height (as in previous tests). There were no problems with any of the joints anywhere on the print.
Sunlu Terminator 3: Price and warranty
- MSRP: $279
- One year warranty
The Sunlu Terminator 3 is available now for $279 on both the Sunlu website (opens in new tab) as well as Amazon (opens in new tab). We have seen Sunlu offering up to 15% off this FDM 3D printer, so if you’re willing to wait, you may be able to snag a compelling deal. Sunlu also provides a basic 12-month warranty with their 3D printers.
In terms of price, at $279 the Sunlu T3 is in the mid-range budget bracket for 3D printers. We feel that it’s a fair price, especially as set-up is so quick and simple and the plentiful amount of accessories included.
Should you buy the Sunlu Terminator 3?

To be honest, this is an excellent model for both beginners and those looking for more of an intermediate printer. Assembly takes roughly 10 minutes, and with auto leveling right out of the box, you can be starting your first print in no time. It has a large enough build plate to compete with almost everything out there (when it comes to print size and cost).
Although the promised speeds are unlikely to be met – at least not with the print quality we would prefer– simple models such as vases and boxes work well with the fast print mode. This is as long as the printer is calibrated and the hot-end temperature is increased by 15 to 20 degrees to compensate for the increased extrusion speed. With the right settings, it shouldn’t be too difficult to reach speeds of around 100 mm/s or slightly higher with clean results. As with any 3D printer, it will take some time to finetune – admittedly, we’re still working on it.
However, it appears that the Sunlu Terminator 3 will be a workhorse once it has been finely tuned. We feel that users will be very pleased with their investment of a Sunlu T3 FDM printer – the numerous added features as well as the spare parts included in the box make it a great deal.


